


Transport Fever 3

Transport Fever 3 gives players control over a growing transportation company built around roads, railways, shipping, aviation, cargo logistics, and passenger services. Compared with earlier games in the series, Transport Fever 3 places greater emphasis on active cargo management, delivery times, warehouses, city ratings, traffic control, and infrastructure optimization. For players preparing to explore these expanded management systems, Z2U provides a marketplace where they can Buy Transport Fever 3 Account and compare available offers from different sellers. For beginners, the key is not to build the biggest network immediately. A successful company usually begins with simple connections and expands as demand increases. This guide explains the most important Transport Fever 3 mechanics and beginner strategies without overwhelming you with unnecessary complexity.
1. Start With the Campaign
Before starting a large Tycoon Mode map, consider playing the Campaign. Transport Fever 3 includes eight campaign missions, with the earlier missions helping introduce important gameplay systems.
The tutorials can help beginners learn how to:
Build roads, tracks, stations, and stops
Create passenger and cargo lines
Purchase and assign vehicles
Connect industries and cities
Understand basic transport demand
Manage an expanding network
Even Transport Fever 2 players can benefit because several logistics and city-development mechanics have changed.
2. Keep Your First Network Simple
A common beginner mistake is spending too much money before a route has proven useful.Instead of immediately building a huge railway, start by solving one transportation problem. Find an industry, identify a useful destination, create the necessary connection, and assign a reasonable number of vehicles.
A practical early progression is:
Identify Demand → Build Connection → Add Vehicles → Observe Traffic → Expand Capacity
Avoid oversized stations and complicated junctions until they are necessary. Every vehicle and infrastructure project has a cost, so unused capacity can make early expansion less efficient.
3. Understand How Cargo Works
Transport Fever 3 changes cargo logistics significantly. Cargo is no longer automatically assigned its final destination when produced. Goods can remain at their production location until your transportation network provides a suitable way to move them.That means players have more direct control over cargo flows.
A basic route could be:
Industry → Loading Point → Truck → Destination
Later, it might become:
Industry → Truck → Warehouse → Freight Train → Regional Hub → Local Delivery
You should therefore think about the entire logistics chain instead of simply connecting two locations and assuming the game will handle everything else.
4. Learn the Four Cargo Categories
Transport Fever 3 divides cargo into four major categories. These categories affect transportation, storage, and specialization.
| Cargo Category | Examples | Typical Handling | Beginner Strategy |
|---|---|---|---|
| Liquid | Oil, fuel | Tanks and tank vehicles | Specialize when volumes become large |
| Bulk | Grain, sand | Silos and open wagons | Useful for high-volume transport |
| Flatbed | Logs, steel | Open storage and flat vehicles | Check vehicle compatibility |
| Goods | Canned food, glass | Freight sheds and closed vehicles | Important for supplying cities |
Universal vehicles provide greater flexibility, making them useful while establishing new routes. Specialized vehicles support fewer cargo types but can provide better loading and unloading performance.A sensible approach is to start flexible and specialize successful high-volume routes later.
5. Use Integrated Loading Docks Early
Industries can provide integrated loading docks, allowing you to start moving cargo without immediately constructing a dedicated freight terminal.This can reduce the initial infrastructure needed for a small route.However, integrated loading facilities have limited loading performance. As cargo volumes increase, they can become bottlenecks.
Watch for:
Long vehicle queues
Growing amounts of waiting cargo
Excessive loading times
Production exceeding transport capacity
When these problems appear, consider upgrading to dedicated freight infrastructure rather than endlessly adding more vehicles.
6. Pay Attention to Delivery Time
Cargo transportation is not only about getting products to their destination. Transport Fever 3 also introduces expected delivery times.Different cargo types have different time requirements. Food, for example, is more time-sensitive than materials such as stone.Late cargo can still generate revenue, but delayed deliveries can reduce a city's Delivery Rating.
This creates an important strategic choice. Before selecting transportation, consider:
Distance
Vehicle speed
Operating cost
Loading time
Cargo volume
Expected delivery time
The fastest transportation method is not automatically the best. Slow but inexpensive transportation may work well for less time-sensitive cargo, while urgent products can benefit from faster routes and efficient loading.
7. Build Warehouses When Logistics Become Complex
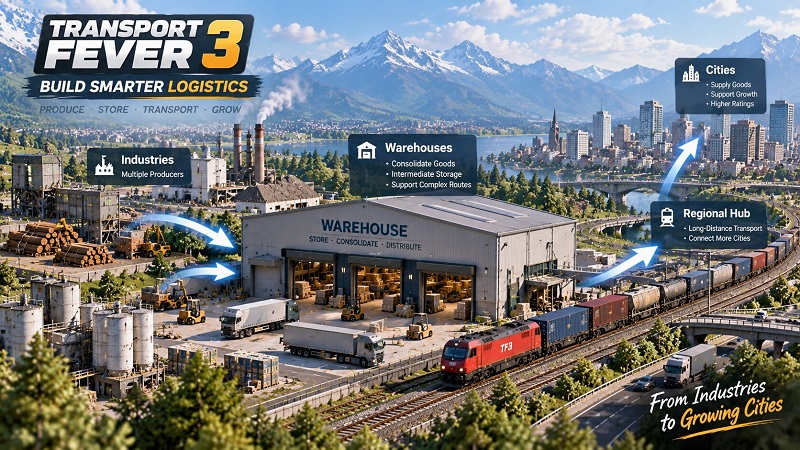
Warehouses become valuable when several cargo routes start interacting.Instead of connecting every producer directly to every destination, you can use warehouses as intermediate storage and distribution centers.
For example:
Several Industries → Warehouse → Railway → Regional Hub → Cities
Warehouses can help:
Consolidate goods from multiple producers
Store cargo between transportation stages
Separate local and long-distance transportation
Create regional distribution centers
Organize increasingly complicated supply chains
Do not build warehouses simply because they are available. A straightforward point-to-point connection may be better for a small operation. Introduce warehouses when your network becomes complex enough to benefit from them.
8. Combine Passenger and Cargo Transportation
A strong Transport Fever 3 network should not focus exclusively on freight. Passenger transportation also contributes to city development.Within cities, buses and trams can connect residential, commercial, and employment areas. Intercity transportation can then connect multiple settlements.
Your passenger network might gradually develop into:
Local Bus → Tram/Urban Hub → Railway Station → Intercity Train
Different transportation modes should complement each other rather than compete unnecessarily.Intercity passenger connections are particularly worth considering as your region develops because transportation between cities contributes to city growth.
9. Monitor City Ratings
Cities in Transport Fever 3 can progress through 18 growth levels, from small settlements toward much larger urban areas. Delivering cargo and transporting passengers can contribute to this development.However, growth also depends on how effectively you manage the consequences of transportation.
Six ratings deserve attention:
Reputation: Your actions toward the surrounding environment can affect company reputation.
Satisfaction: Passenger waiting times, journey times, and comfort matter.
Delivery: Timely cargo deliveries support this rating.
Traffic: Road congestion can damage transport efficiency.
Noise: Busy transportation infrastructure can negatively affect nearby areas.
Pollution: Vehicles, industries, and infrastructure can create pollution.
This means a profitable line can still create problems elsewhere.
10. Think Carefully About Freight Hub Locations
Putting heavy freight traffic directly through a city center may provide a short route, but it can also increase congestion, noise, and pollution.As your network grows, consider separating long-distance freight from local urban transportation.
For example:
Industrial Zone → Freight Hub → Railway → Outer-City Terminal → Local Distribution
Passenger networks can use a similar approach, with buses or trams connecting neighborhoods to major railway stations.There is no universally perfect layout. Moving a station farther outside a city may reduce noise but increase travel time. Transport Fever 3 is about balancing these competing requirements.
11. Solve Traffic Bottlenecks With Advanced Tools
Large cities eventually create road congestion. Transport Fever 3 provides detailed traffic tools for controlling:
Lane connections
Turning lanes
Pedestrian crossings
Traffic-light phases
Lane merging and splitting
Highway ramps
Beginners do not need to use every advanced feature immediately.Build simple roads first. When congestion develops, identify the actual bottleneck before rebuilding an entire district. Sometimes changing a junction or vehicle route is more effective than simply adding additional lanes.
12. Manage Busy Railways With Priorities and Waypoints
Railway congestion becomes important when passenger and freight trains share tracks.Transport Fever 3 allows lines to receive different priorities. This can help a fast passenger service move through a busy corridor without constantly becoming trapped behind slower freight trains.Waypoints provide another useful tool. They allow you to influence which route a line follows, helping separate services across complicated networks.
These features are particularly useful around:
Major railway junctions
Shared passenger and freight tracks
Large stations
Bypass routes
Regional hubs
Keep your first railway simple and introduce these tools when actual congestion appears.
13. Remember Vehicle Maintenance
Vehicles experience wear, making maintenance another part of long-term network planning.Maintenance buildings can service vehicles passing through their effective area when sufficient capacity is available. For large transport networks, placing maintenance facilities along important corridors can be more efficient than forcing vehicles to make unnecessary detours.Maintenance should therefore become part of your infrastructure planning as your fleet grows.
14. Choose Your Headquarters Location Carefully
Your company headquarters is not purely decorative. It provides a growth bonus to the nearest city, while additional benefits can become available as your company develops.
Consider placing it near a settlement you expect to become an important regional center.
Look for:
Nearby industries
Good railway expansion opportunities
Connections to neighboring cities
Space for future transport infrastructure
Final Tips for Transport Fever 3 Beginners
The most important lesson is to expand according to demand rather than trying to construct your final transportation empire immediately.
Remember these principles:
Learn the basics through the Campaign.
Start with simple, affordable routes.
Understand where cargo needs to go.
Use universal vehicles before specializing.
Watch delivery times and loading bottlenecks.
Add warehouses when logistics become complicated.
Develop passenger and freight networks together.
Monitor city ratings as settlements grow.
Keep heavy freight away from sensitive urban areas when practical.
Use traffic controls, priorities, and waypoints to solve actual problems.
Maintain vehicles and regularly review older routes.
Conclusion
Transport Fever 3 rewards careful expansion and continuous optimization. Your first network does not need to be large or complicated. A small cargo route or passenger connection can provide the foundation for a much larger regional transportation system. As demand increases, upgrade loading facilities, introduce warehouses, expand passenger connections, manage city ratings, and solve congestion with more advanced infrastructure tools. Most importantly, keep adapting. A network that works perfectly for a small town may need significant changes once that settlement grows into a major city. If you are looking for a convenient way to get started, Z2U offers a marketplace where you can find a Cheap Transport Fever 3 Accountand compare listings from different sellers. Build for current demand, leave room for future expansion, and improve your network as new transportation challenges appear.









SUPPORT
LEGAL
Policies






 USD ($)
 English
  Help Center